Smooth Ceilings: Your Ultimate Popcorn Ceiling Removal Guide
Table of Contents
- Why Remove Popcorn Ceiling?
- The Asbestos Question: Is Your Popcorn Ceiling a Health Risk?
- Three Main Methods for Popcorn Ceiling Removal
- Essential Tools and Materials for Popcorn Ceiling Removal
- Preparing Your Workspace for Popcorn Ceiling Removal
- Step-by-Step Guide to Wet Scraping Popcorn Ceiling
- Refinishing Your Ceiling After Popcorn Removal
- Is DIY Popcorn Ceiling Removal Right for You?
Why Remove Popcorn Ceiling?
Popcorn ceilings, also often referred to as acoustical ceilings, were all the rage in the '60s and '70s, primarily because they were a quick and inexpensive way to hide imperfections in sheetrock ceilings and offered some sound dampening. However, their aesthetic appeal has waned significantly over the decades. Today, they are widely considered an outdated feature that can make a room feel smaller, darker, and less modern. If you're looking to update your home’s aesthetic, removing the popcorn ceiling can significantly enhance the room’s look. Beyond aesthetics, there's a more serious concern: the potential presence of asbestos. From the 1950s to the early 1980s, ceiling texture frequently contained some amount of asbestos. Popcorn ceilings installed during this time frame are likely to have anywhere from 1 to 10% asbestos. This is a critical factor that dictates how you approach popcorn ceiling removal, as asbestos is a known cause of lung cancer and other serious respiratory diseases.The Asbestos Question: Is Your Popcorn Ceiling a Health Risk?
How you treat popcorn ceiling texture depends partly on whether you think the texture material contains asbestos. Not all popcorn ceilings have asbestos, but if you have a popcorn ceiling installed before 1980, it could contain asbestos, a known cause of lung cancer. This is the most crucial consideration before you begin any removal process. Ignoring this risk can have severe long-term health consequences for you and your family.How to Test for Asbestos
Before removing any popcorn ceiling texture, it is absolutely essential to test for asbestos. This isn't a step to skip. Contact your local health department and ask about getting a sample tested. You can also find certified asbestos testing kits online or at home improvement stores, but professional testing is always recommended for accuracy and peace of mind. The process typically involves carefully taking a small sample of the texture and sending it to a certified lab for analysis. Ensure you wear appropriate protective gear, including a respirator and gloves, even when taking a small sample, to minimize any potential exposure.What to Do if Asbestos is Present
If the test comes back positive, you’ll need to hire pros to remove or cover the asbestos ceiling. This is not a DIY job. Asbestos abatement is a highly specialized field that requires specific training, equipment, and protocols to ensure safe removal and disposal. Attempting to remove asbestos-containing materials yourself can release dangerous fibers into the air, contaminating your home and posing a severe health risk. Professional abatement companies are equipped to handle this hazardous material safely, protecting both your health and your property. They will follow strict regulations to contain the area, remove the material, and properly dispose of it.Three Main Methods for Popcorn Ceiling Removal
If you’d like to get rid of a popcorn ceiling and bring your home into the 21st century, you have a couple of options. Learn three methods for removing popcorn ceiling: scraping, covering, or skim coating. Each method has its own set of pros and cons, tools, steps, and costs. Compare them to decide which approach is best suited for your home and skill level.Method 1: The Wet Scrape Method
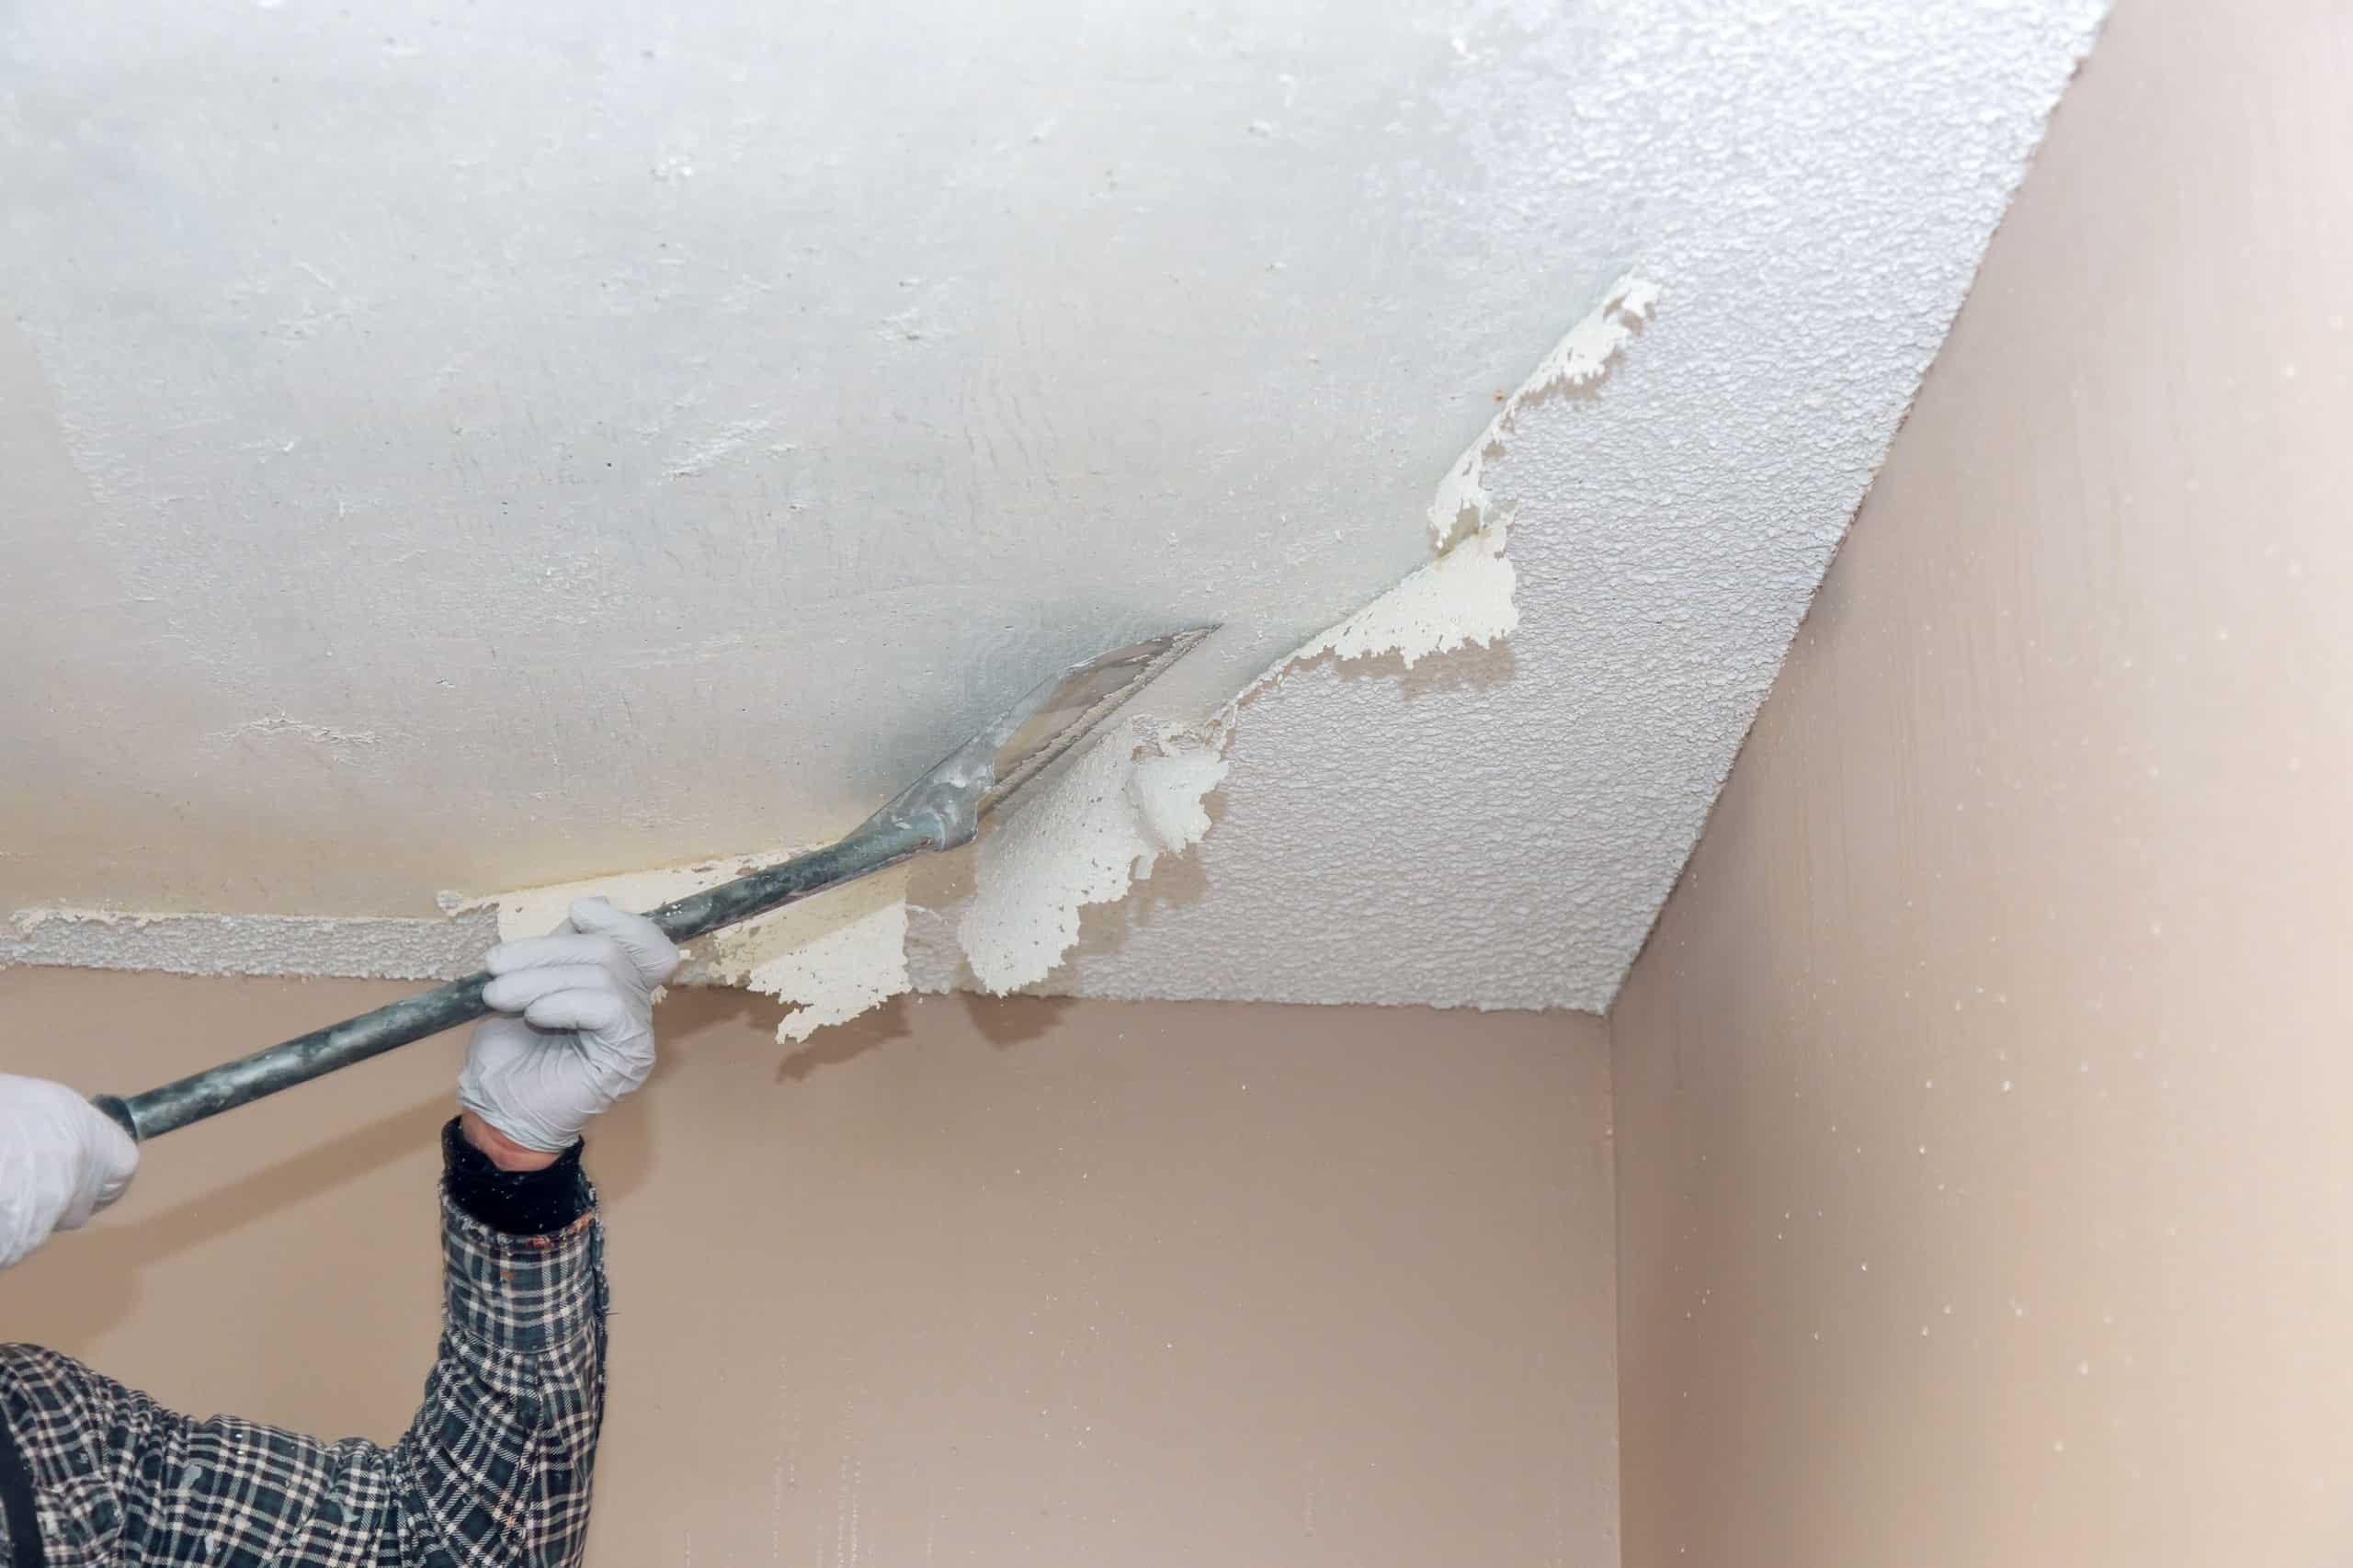
The wet scrape method is the most common and often the easiest way to remove a popcorn ceiling, especially if it hasn't been painted. This approach involves lightly misting the ceiling with water to soften the texture, making it easier to scrape off. When dry, the popcorn texture tends to be quite brittle and dusty, but moistening it transforms it into a more pliable, goopy substance that comes off in larger chunks. * **Pros:** * Generally the least expensive DIY method. * Can be done by a homeowner with basic tools. * Results in a smooth, paint-ready surface. * **Cons:** * Extremely messy, creating a significant amount of waste. * Labor-intensive, especially for large areas. * Popcorn ceilings that have been painted could prove more difficult to remove; the paint acts as a sealant, making it less absorbent, requiring more effort or scoring. * Requires extensive room preparation to protect surfaces. * **Tools & Materials:** Spray bottle or garden sprayer, wide putty knife (6-10 inches) or specialized ceiling scraper tool, drop cloths, protective gear (respirator, safety goggles, gloves, coveralls), bucket for waste. * **Steps:** Prepare the room thoroughly, spray small sections of the ceiling with warm water, let it soak, then scrape. We will detail this further in a dedicated section.Method 2: Covering the Popcorn Ceiling
If the idea of scraping sounds too messy or if you have an asbestos-containing ceiling that you cannot remove, covering it is a viable alternative. This involves installing a new layer directly over the existing popcorn texture. * **Options:** * **New Drywall:** You can install new sheets of drywall directly over the popcorn ceiling. This provides a perfectly smooth, new surface. * **Ceiling Panels/Planks:** Various decorative ceiling panels or wood planks can be installed, offering a different aesthetic. * **Pros:** * Avoids the mess and potential hazards of removal, especially with asbestos. * Can be quicker than scraping, especially for large areas. * Provides a brand-new, smooth surface for painting or finishing. * Offers additional soundproofing depending on the material. * **Cons:** * Adds weight to the ceiling structure, which needs to be considered. * Reduces ceiling height slightly. * Can be more expensive than DIY scraping due to material costs. * Requires more advanced carpentry skills if installing drywall or planks. * **Tools & Materials:** Drywall sheets/panels/planks, screws, drywall lift (for drywall), power drill, measuring tape, utility knife, joint compound (for drywall), paint. * **When to Choose:** Ideal for homes with asbestos-containing ceilings, or for homeowners who prefer a less messy and potentially faster solution, and are comfortable with more involved construction work.Method 3: Skim Coating Over Popcorn
Skim coating involves applying thin layers of joint compound directly over the popcorn texture to create a smooth surface. This method is less invasive than full removal but requires a good deal of patience and skill to achieve a professional finish. * **Pros:** * Less messy than scraping, as no material is removed. * Can be done without special tools beyond standard drywall tools. * Avoids the need to test for asbestos if you choose not to disturb the material (though testing is still recommended if you're concerned about future disturbance). * **Cons:** * Requires significant skill in drywall finishing to achieve a smooth, even surface. * Can be very time-consuming, as multiple thin coats are needed with drying time in between. * Adds some weight to the ceiling. * If the popcorn texture is very thick or loose, it may not adhere well, leading to cracking. * **Tools & Materials:** Large drywall knives (10-14 inches), joint compound (all-purpose or lightweight), mud pan, sanding pole with fine-grit sandpaper, work light, protective gear. * **Steps:** Clean the ceiling, apply a thin first coat of joint compound, let dry, sand lightly, apply a second (and possibly third) coat, sand smooth. * **When to Choose:** Best for those with some drywall finishing experience or a willingness to learn, who want to avoid the mess of scraping but don't want to add significant thickness with new drywall.Essential Tools and Materials for Popcorn Ceiling Removal
Removing a popcorn ceiling is simple with the right tools and supplies. To remove a popcorn ceiling, you’ll need a specific set of tools and materials to ensure efficiency, safety, and a clean outcome. Here’s a comprehensive list: * **Protective Gear:** This is non-negotiable. Put on protective gear, including a dust mask or respirator (N95 or P100 for fine dust), safety goggles, gloves, and coveralls. Popcorn ceiling removal creates a great amount of dust and wet, goopy texture product. * **Drop Cloths/Plastic Sheeting:** Heavy-duty plastic sheeting (4-6 mil) is essential for covering the entire floor, walls (up to a few feet), and any remaining furniture. Consider any exposed surface to be a potential recipient of wet, goopy texture product. * **Garden Sprayer or Pump Sprayer:** For moistening the ceiling. A garden sprayer allows you to cover a larger surface area more efficiently than a small spray bottle. * **Scraping Tools:** * **Putty Knife or Drywall Knife:** A wide putty knife (6-10 inches) or a drywall knife is standard. * **Specialized Popcorn Ceiling Scraper:** For smoother results, use a specialized popcorn ceiling scraper that attaches to an extension pole and often has a bag attachment to catch debris. This can significantly reduce mess. * **Ladder or Scaffolding:** For reaching the ceiling safely and comfortably. * **Buckets:** Several large buckets for collecting scraped material and for water. * **Sponge and Water:** For wiping down the ceiling after scraping. * **Drywall Repair Tools:** For patching any imperfections after removal. This includes joint compound, drywall tape, mud pan, and smaller putty knives. * **Sanding Pole and Sandpaper:** For smoothing the ceiling after patching and drying. * **Work Lights:** Bright, portable work lights can help you spot imperfections. * **Utility Knife:** For scoring painted popcorn ceilings or cutting plastic sheeting.Preparing Your Workspace for Popcorn Ceiling Removal
Proper preparation is key to minimizing mess and ensuring a smooth process. Your first step is to remove absolutely everything from the room. When you remove the popcorn ceiling, all the tiny pellets will end up on the floor. If you have furniture, you’re going to be picking it off the furniture for years to come. 1. **Empty the Room:** Remove all furniture, rugs, wall decor, and anything else that can be moved. If there are built-in fixtures or items too heavy to move, remove all lightweight furniture from the room and cover the remaining items completely with plastic sheeting. 2. **Cover Everything:** Drape heavy-duty plastic sheeting over the entire floor, taping it securely to the baseboards. Extend the plastic up the walls about 2-3 feet and tape it there as well. Cover any light fixtures, ceiling fans (after turning off power at the breaker), and electrical outlets with plastic and painter's tape. You want to create a "containment zone" to catch all the debris. 3. **Turn Off Power:** Crucially, turn off the power to the room at your main electrical breaker. This is for safety, especially when working near light fixtures or when moistening the ceiling. 4. **Protect Yourself:** Put on all your protective gear: respirator or dust mask, safety goggles, gloves, and coveralls. This protects you from dust, wet debris, and potential irritants.Step-by-Step Guide to Wet Scraping Popcorn Ceiling
With proper preparation and the right tools, you can begin removing the popcorn ceiling. The easiest way to remove a popcorn ceiling is by using the wet scrape method. This approach involves lightly misting the ceiling with water to soften the texture, making it easier to scrape off. 1. **Perform a Scrape Test:** Before you start removing the old popcorn texture, do a simple scrape test in a small area of the ceiling. First, try scraping a dry area of the ceiling with your drywall knife. If it comes off easily, you might be able to dry scrape, but this is rare and very dusty. More likely, you'll see how difficult it is when dry. This test also helps you get a feel for how much pressure to apply. 2. **Mist the Ceiling:** Working in small sections (e.g., 4x4 feet), spray the ceiling with warm water using your garden sprayer. Ensure the area is thoroughly saturated but not dripping excessively. Let the water sink in for a few minutes. The goal is to soften the texture, not to soak the drywall underneath. Popcorn ceilings that have been painted could prove more difficult to remove; the paint acts as a sealant, making it less absorbent. For painted ceilings, you might need to score the surface with a utility knife before spraying to allow the water to penetrate, or apply more water and let it sit longer. 3. **Scrape the Texture:** Once the texture is softened, use your wide putty knife or specialized ceiling scraper. Hold the scraper at a slight angle (around 20-30 degrees) to avoid digging into the drywall. Apply steady, even pressure and scrape the softened texture off. The wet, goopy material will fall onto your drop cloths. Empty your scraper into a bucket as it fills up. 4. **Repeat and Overlap:** Continue working in small sections, overlapping slightly with the previously scraped area to ensure complete removal. Re-mist areas as needed if they dry out before you can scrape them. 5. **Clean Up Rough Spots:** After the bulk of the popcorn is removed, you'll likely have some stubborn spots or residual texture. Lightly re-mist these areas and scrape them clean. You can also use a damp sponge to wipe down the ceiling and remove any remaining fine particles. 6. **Allow to Dry:** Once all the popcorn texture is removed, let the ceiling dry completely. This might take 24 hours or more, depending on humidity and how much water was used.Refinishing Your Ceiling After Popcorn Removal
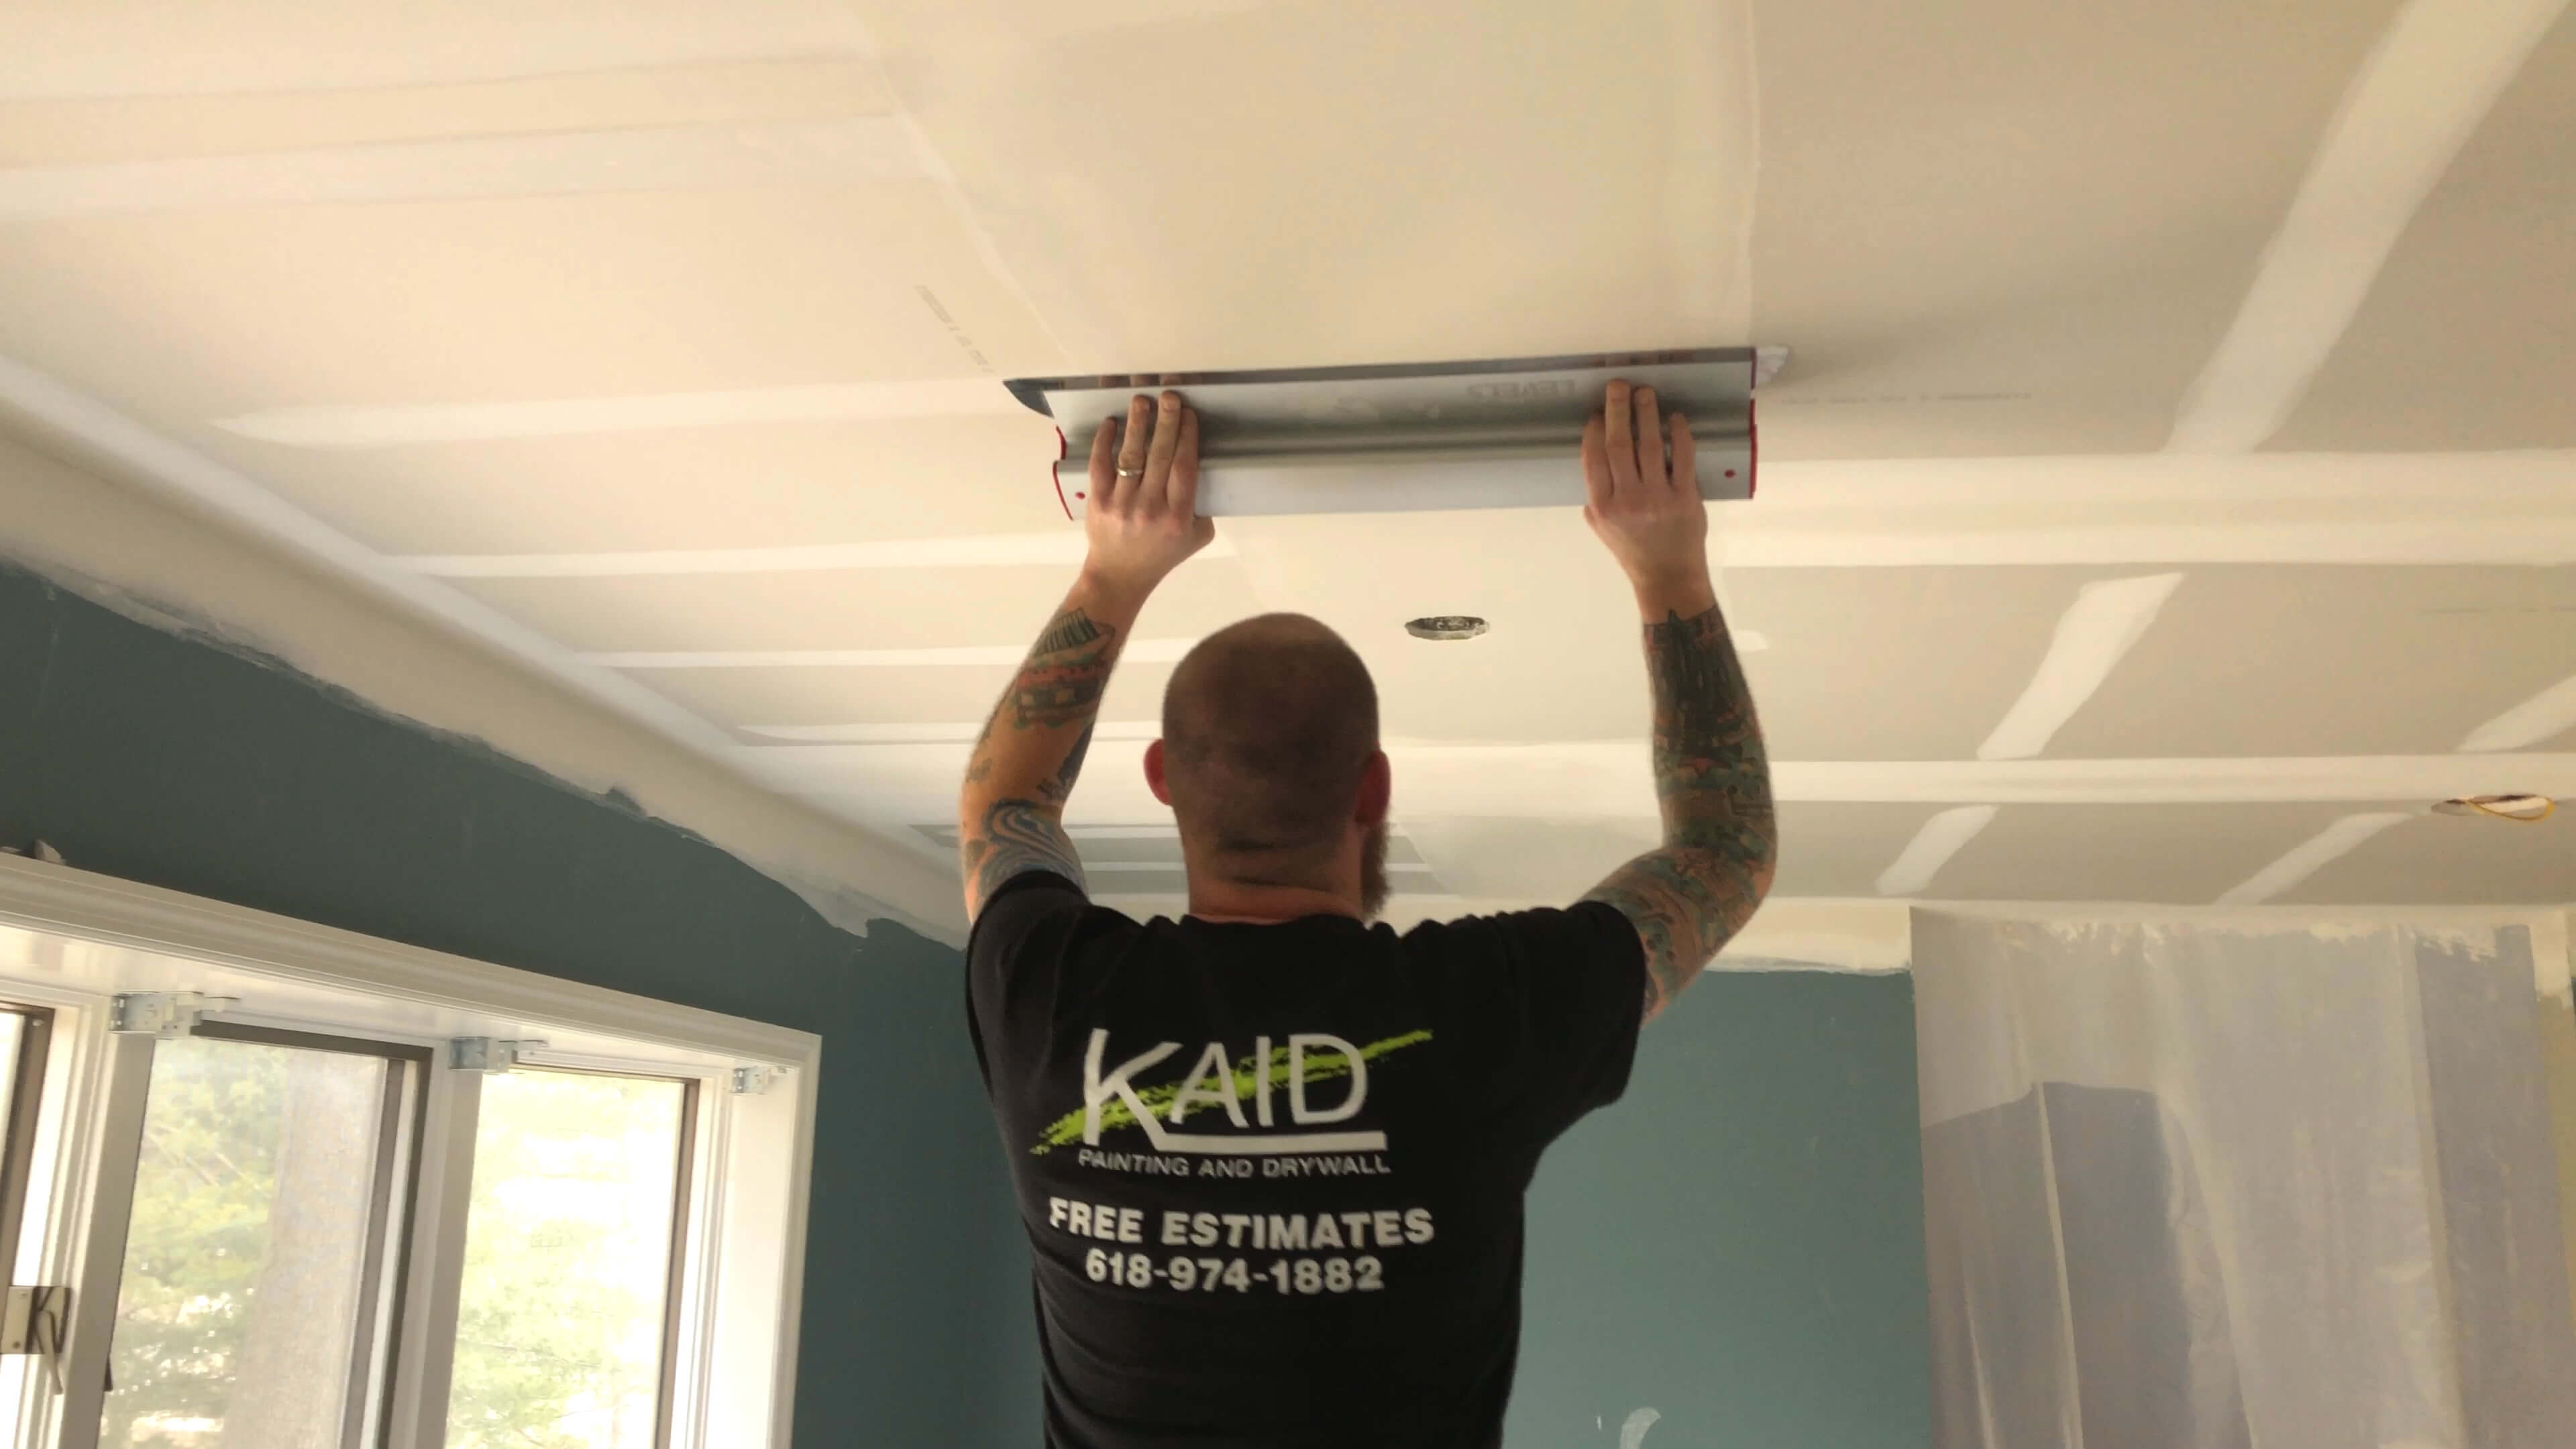
Once the popcorn texture is gone and the ceiling is dry, you'll likely find imperfections. The original drywall underneath was often installed quickly and without the expectation of being a perfectly smooth surface. 1. **Patch and Repair:** Inspect the ceiling for any gouges, holes, or uneven seams from the original drywall installation or from the scraping process. Use joint compound to patch these imperfections. Apply thin layers, allowing each layer to dry completely before applying the next. 2. **Sand Smooth:** Once all patches are dry, use a sanding pole with fine-grit sandpaper (e.g., 120-150 grit) to sand the entire ceiling smooth. Wear your respirator for this step, as it will create a lot of fine dust. 3. **Clean Dust:** Thoroughly wipe down the ceiling with a damp cloth or sponge to remove all sanding dust. This is crucial for paint adhesion. 4. **Prime:** Apply a high-quality primer designed for new drywall or previously painted surfaces. This will seal the surface and provide a consistent base for your paint, preventing flashing or uneven color. 5. **Paint:** Finally, apply two coats of your chosen ceiling paint. Use a roller for large areas and a brush for edges and corners.Is DIY Popcorn Ceiling Removal Right for You?
Can I remove popcorn ceiling myself if I’m not a professional? Yes, for many homeowners, especially if the ceiling does not contain asbestos and is unpainted, DIY popcorn ceiling removal is a feasible project. However, it’s crucial to wear protective gear and follow safety precautions. Removal time depends on the ceiling size and the method used. A small room might take a day or two of active work, while a larger area or an entire house could take several days or even weeks. While the wet scrape method is often touted as the easiest, it is also incredibly messy. Popcorn ceiling removal creates a great amount of waste. Be prepared for the extensive cleanup required. For those who prefer a less labor-intensive or less messy approach, or if asbestos is a concern, consider covering or skim coating. Learn how to safely and efficiently remove popcorn texture from your ceiling with tools and techniques from Paul Ricalde, a home improvement expert, who emphasizes proper preparation and technique for a successful outcome. If you're comfortable with physical labor, don't mind a big mess, and have confirmed no asbestos, then DIY removal can save you significant money. However, if you have any doubts about asbestos, or if the project seems too overwhelming, hiring a professional is always the safest and most efficient option. Transforming your home by removing popcorn ceilings is a rewarding project that can significantly modernize your living space. By understanding the methods, preparing diligently, and prioritizing safety, you can achieve a smooth, contemporary ceiling that you'll love for years to come. --- Have you tackled popcorn ceiling removal in your home? Share your experiences, tips, or questions in the comments below! We'd love to hear how you brought your home into the 21st century. If you found this guide helpful, consider sharing it with friends and family who might also be looking to update their ceilings.- Adriana Lima Top Fell
- Daisy Melanin Viral Video Original Youtube
- Bollyflix Ninja
- Aagmaalgives
- Who Is Conchita Mart%C3%ADnez Married To

11 Tips on How to Remove Popcorn Ceiling Faster and Easier | Family
How to Remove a Popcorn Ceiling
How to Remove Popcorn Ceilings - LEVEL5 Tools LLC.
