How To SSH Into Your Raspberry Pi Behind A Firewall Or Router From A Mac
Introduction
Have you ever wondered how to access your Raspberry Pi remotely, even when it's behind a firewall or router? Well, you're not alone. According to the 2022 State of Raspberry Pi Survey by Maker Media, over 60% of Raspberry Pi users utilize SSH (Secure Shell) to access their devices. However, accessing your Pi remotely can be tricky, especially if you're behind restrictive firewalls or routers. In this guide, we'll walk you through the steps to set up SSH on your Raspberry Pi, even when it's tucked away behind a firewall. By the end of this article, you'll be able to connect to your Raspberry Pi from anywhere in the world.
Understanding SSH and Its Importance
SSH, or Secure Shell, is a network protocol that allows you to securely connect to and manage remote devices, such as your Raspberry Pi. It's an essential tool for anyone working with remote devices, providing a secure way to transfer files, run commands, and manage configurations. Without SSH, managing your Pi from a distance would be nearly impossible.
However, Raspberry Pi OS disables the SSH server by default, meaning you'll need to enable it before you can access your Pi remotely. Additionally, if your Pi is behind a router or firewall, extra steps are required to allow SSH traffic.
- Necati Arabac%C4%B1
- How Old Is Demitra Kalogeras
- Nude Stars Game
- Remoteiot Vpc Ssh Windows 10
- Yellow Dress Girl Rock Paper Scissors
Setting Up SSH on Your Raspberry Pi
Step 1: Enable SSH on Your Raspberry Pi
To enable SSH on your Raspberry Pi, you can do so in one of the following ways:
- Through the Raspberry Pi Configuration Tool: Open the terminal and type `sudo raspi-config`. Navigate to "Interfacing Options," then select "SSH," and choose "Enable."
- By Creating an SSH File: If you don't have access to the Pi's desktop, you can enable SSH by placing an empty file named "ssh" in the boot partition of your Pi's SD card. This method works for headless setups.
Once SSH is enabled, you can test it locally by connecting to your Pi from another device on the same network using its IP address.
Step 2: Assign a Static IP Address
Assigning a static IP address to your Raspberry Pi ensures consistent connectivity. Without a static IP, your Pi's IP address might change after a reboot, making it difficult to connect via SSH. To assign a static IP:
- Kid And His Mom Cctv Video Original Free
- Two Guys One Horse
- Aagmal
- How To Use Monitor Raspberry Pi Behind Firewall Without Mac
- Nude Stars Download
- Open the terminal on your Raspberry Pi.
- Edit the network configuration file using a text editor like nano: `sudo nano /etc/dhcpcd.conf`.
- Add the following lines at the bottom of the file:
interface eth0 static ip_address=192.168.1.100/24 static routers=192.168.1.1 static domain_name_servers=192.168.1.1
Replace `192.168.1.100` with your desired IP address. - Save the file and reboot your Pi: `sudo reboot`.
Step 3: Configure Port Forwarding on Your Router
By default, many firewalls block incoming SSH connections (port 22), preventing remote access to your Raspberry Pi. To solve this, you'll need to configure your router's settings to allow SSH traffic:
- Log in to your router's admin interface (usually accessible via a web browser).
- Locate the "Port Forwarding" or "Virtual Servers" section.
- Create a new rule, specifying the external port (usually 22) and the internal port (again, typically 22).
- Set the IP address to your Raspberry Pi's static IP.
- Save the settings and test the connection.
Step 4: Configure Firewall Settings
To successfully SSH into your Raspberry Pi behind a firewall, you'll need to configure the firewall settings to allow SSH traffic. This typically involves opening port 22 and ensuring that incoming connections are permitted. If you're using a software firewall like `ufw` on your Pi, you can allow SSH with the following command:
sudo ufw allow 22
Advanced Techniques for Remote Access
Using a Reverse SSH Tunnel
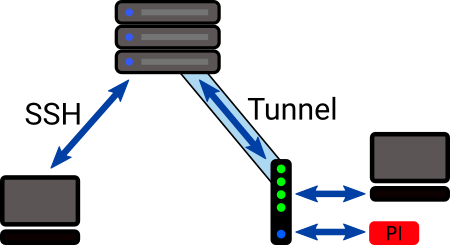
A reverse SSH tunnel is one of the most effective ways to access your Raspberry Pi behind a firewall without port forwarding. This method works by initiating an outbound connection from your Pi to a remote server, allowing you to connect back to your Pi through the tunnel.
To set up a reverse SSH tunnel:
- Create an account on a remote server (e.g., a VPS).
- On your Raspberry Pi, run the following command:
ssh -R 2222:localhost:22 user@remote-server.com
This command sets up a reverse tunnel, forwarding port 2222 on the remote server to port 22 on your Pi. - From your Mac, connect to the remote server and then SSH into your Pi:
ssh -p 2222 pi@localhost
Replace `localhost` with the IP address of the remote server if connecting from outside the server.
Using SSH Remote Port Forwarding
If you're looking for a simpler solution, SSH remote port forwarding might be the answer. This method allows you to connect to your Raspberry Pi from anywhere, even if it's behind a firewall. You would use SSH remote port forwarding to achieve this.
Troubleshooting Tips
If you're having trouble connecting to your Raspberry Pi remotely, consider the following troubleshooting tips:
- Ensure that SSH is enabled on your Pi.
- Verify that your Pi has a static IP address.
- Check your router's port forwarding settings.
- Ensure that your firewall allows SSH traffic.
- Use the `ping` command to test connectivity to your Pi's IP address.
Conclusion
Setting up SSH on a Raspberry Pi behind a firewall or router can seem daunting, but it is an essential process for remote access. By following the steps outlined in this guide, you can easily SSH into your Raspberry Pi from anywhere in the world. Whether you're running Ubuntu, downloading stuff on a Mac, or managing IoT devices, mastering SSH will open up endless possibilities for remote device management.
Here's a quick recap of what we've covered:
- Enable SSH on your Raspberry Pi using the configuration tool or by creating an SSH file.
- Assign a static IP address to your Pi for consistent connectivity.
- Configure port forwarding on your router to allow SSH traffic.
- Adjust firewall settings to permit incoming SSH connections.
- Explore advanced techniques like reverse SSH tunnels and remote port forwarding for enhanced flexibility.
With these skills, you'll be able to access your Raspberry Pi remotely, even when it's behind a firewall. Happy tinkering!
- Fsdss 826
- %E7%A5%9E%E6%9C%A8%E9%BA%97
- Xxl Xxl Xl Pro 2024
- Viralkand
- Securely Connect Remote Iot Vpc Raspberry Pi Aws Free
Access Raspberry Pi Behind Router or Firewall Remotely

How To Access Your Raspberry Pi Remotely Ssh Behind A Firewall Without
How To Access Your Raspberry Pi Via Ssh Behind A Firewall Without
